How I Make a Watermark
Okay, this is not an “official” guide on watermarking. I am sure there are many out there who are far better qualified than I to properly share the technically correct way to achieve a ‘proper’ autograph on your photo or work of digital art. I know some people create brushes that do the job. I have no clue about anything like that. But this is how I create my watermark. And if you know me at all, you’ll know one thing for sure: it’s pretty simple. Gotta be, or I’d not being doing it.
Life’s too short to get complicated, don’t you think?
I am also not here to tell whether you should or shouldn’t watermark – I do, because I send mine out into the blogosphere and I like to stamp my shots as MINE. Not that I think my photos are particularly special but this way, if people want to ‘borrow’ them, then it’s clear they are borrowed. And hopefully it reminds them to ask me if I mind (I usually don’t, depending on the purpose). I don’t want the watermark to take away too much from the photo so I try to keep it reasonably subtle.
You will need Photoshop (I use PS7 – I know it’s ancient but it is quite sufficient for this) or something similar. I believe Photo Elements is also capable of following this series of tasks.
*.*.*.*
1. Choose your image, pull it into Photoshop (or your chosen image program) and tweak to your heart’s content. When you are happy with the end result, save the image (in it’s original size). This is handy to come back to if you stuff up, or the computer seizes up later on. (Let’s not pretend that can’t happen!)
2. Resize the image to fit your purposes (I resize all my shots to 580 pixels wide at 72 dpi as I know this will fit exactly into my blog column). If you want to print your image, then work out what the maximum size you will need and set it to that. You can always resize down later on.
3. Choose your TYPE tool…

Click it anywhere on the image and it will automatically create a new layer on your image. (Check your layers tab – you can rename this new layer if you want to – I tend to leave it and it will take on the watermark text as its title as you go.)
3. Choose your font and colour from the Character Tab.
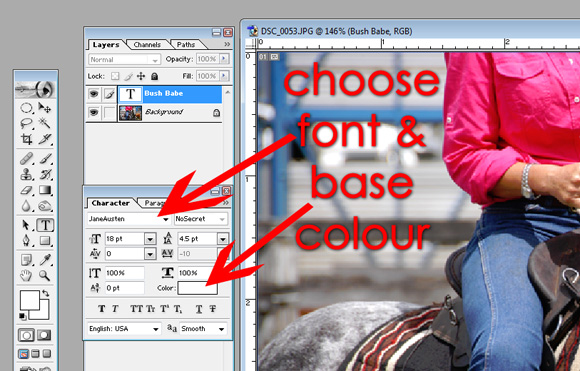
Hint: if you cannot find the tabs I refer to here, simply go to ‘Window’ (at the top right of the Photoshop toolbar) and tick the choices you need to show. Depending on the image, I use white or black (again, because I am a simple woman).
4. Now type the words you’d like in your watermark.

You don’t have to spell it all out, some people use just initials, some people add in dates or a year underneath.
Whatever floats your boat.
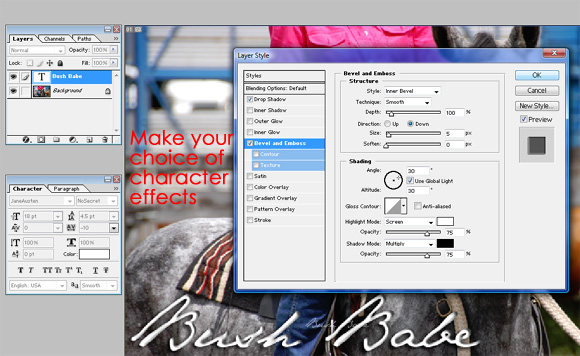
5. Choose your additional ‘text effects’
This is not hard – just right-click on your newly created layer in the Layers tab. A drop down will appear like this:

Choose Blending Options… I am a bit of an EMBOSS freak. A DROP SHADOW is fun sometimes too… just play with the options and see what works for you.
7. Reduce the opacity of the watermark layer.
At the top of the Layers tab there is a slide took for the Opacity (how solid or see-through you want the layer to be). I tend to reduce it quite a bit, so the watermark is fairly subtle (like a … well, a watermark!)

8. Time to position the watermark where you want it on the image. This will possibly change a little from image to image, depending on where it interferes least with the shot. To move the layer around make sure you have the ‘move’ tool engaged (in PS7, its the one at the top right of the tall, narrow toolbar that sits on the left of the Photoshop page). You can also use your arrow keys to ‘nudge’ the layer small amounts.
If you need to resize the watermark, you will need to ‘Transform’ the layer, so hit Ctl-T (or Edit, Free Transform) and then right-click to get this drop down menu…

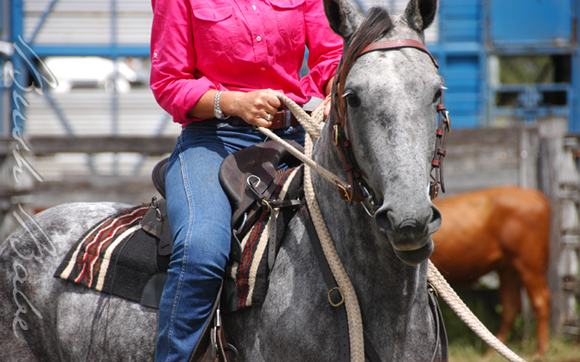
I think this photo needed the watermark to sit sideways to be less obtrusive, so I chose to rotate it 90 degrees clockwise. I then hit Ctl-T again and resized it down a little by dragging one corner of the transform rectangle inward. Hint: if you want to retain the original proportions of the watermark text when changing the size through a Transform, hold the shift key down while you resize.
9. If you are doing a batch of images now, and you want the same watermark on all, simply save your first effort (still in layers so it will need to be a PSD file). You will be able to drag this watermark layer across from this ‘base’ image to each new (prepared) image to add this same watermark to them.
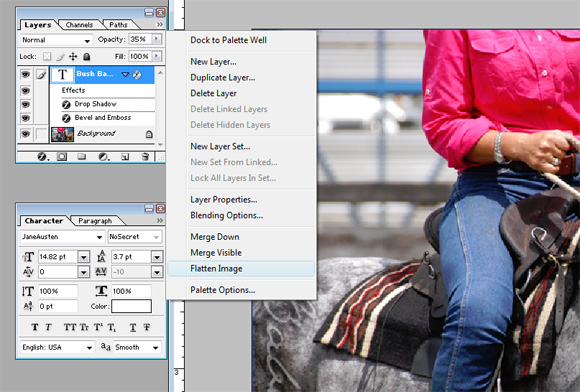
10. FLATTEN the layers… this allows the image to be a JPEG (perfect for keeping file sizes reasonable, and ready to upload for printing or to blog). To flatten, click on the wee little arrows at the top right of the Layers tab. Choose Flatten Image. You will see that the Layers will now just show a single Background layer.
11. Save new version of image – I do this, so I always have a ‘clean’ and a ‘watermarked’ version in case I DON’T want the watermark for some reason later on…
Hint: have a system for your filing when you do this. My system is usually that my raw image (unworked) is saved in its DSC format (DSC_001), a worked shot is named for the event (draft_001), the resized and watermarked version uses a suffix (draft_001 b). It helps when you have twenty trillion photos to trawl through to find the version you want… not that I have THAT many… yet!
12. UPLOAD or PRINT and ENJOY…
Try it and see if I have explained it clearly. Just because it all makes sense to me, doesn’t mean I have shared it with you very well!
Do you create a watermark differently? Please share your tips in comments…
*.*.*.*
Please note: This tutorial might seem long-winded to do every time you want to watermark, but what I do is to turn the above set of tasks into an Action in Photoshop.
(I promise to show how to do THAT soon, but I won’t complicate things today).

9 Comments
JENNY TALIA
OK, I’ve chosen my image…
Now what?
–
–
–
It’s OK, I’ve got it sorted I think
Oh wait, now all my photos say BUSH BABE
That’s alright with you isn’t it?
HAHA!
Some people just can’t be taught!
JT
x
Bush Babe
Oh HO HO ho! You dag… now you TOTALLY have me worried. What photos are going to end up with my name on them?
🙂
BB
debby
Previous post? Skite away. It’s a great picture and it’s not everyday you get to mortify your husband on a world stage. (oooh. Wait. Did I say that out loud…) And as far as writing my own name on my own pictures…well, as soon as I learn to take pictures worth bragging about, I just might want to do that. However, right now, I don’t really seem to need that information.
.-= debby´s last blog ..Apology =-.
SleeplessInKL
I use Photoshop Elements and do it just about the same way, except that I don’t bother about effects other than changing the colour to suit the photo and adjusting the opacity (if I feel like it). And just like you, I like to ‘brand’ my pics (like you brand a calf) because so many people like to ‘borrow’ pics without even asking.
Cheryl
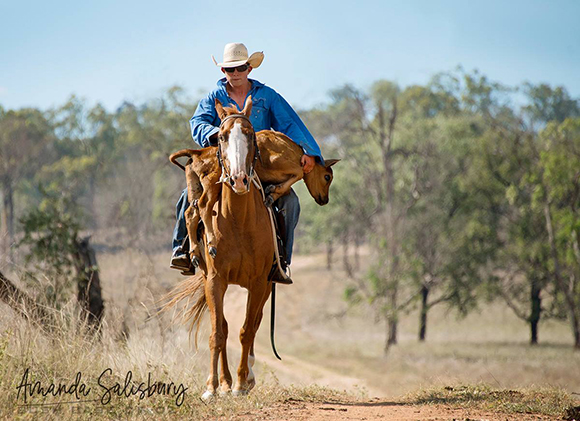
Well described and, yes, easy to follow. I just couldn’t take my eyes off that gorgeous horse – great shot.
.-= Cheryl´s last blog ..Happiness is a feeding joey =-.
Tracey
LOL @ Jenny
I really should start watermarking my images. I guess I never considered them that worthy, but they’re mine.
Now I’m heading off to photoshop to make up my very own watermark brand. (Though I’m going to be impatient waiting for the instructions on how to make it into an Action!)
.-= Tracey´s last blog ..Images of an early start. =-.
Amanda
You are awesome – I’ve always wondered how you did that watermark as it looks SO COOL.
.-= Amanda´s last blog ..Dear Darl, it’s May 20 =-.
Red Dirt Mummy
Considering how badly I suck at following directions… it only took 3 goes and I finally got it! The problems were all on my side, not yours 😉 Thanks for this – very cool.
Tracy
Very helpful…thanks.